I use acrylic craft paints and craft brushes I purchase at Wal-Mart. Most of my paints are Folk Art and Apple Barrel brands. These paints can be purchased for around $0.50 a bottle. The bottles are plastic squeeze bottles with flip top lids and contain 2 fluid (59 ml)ounces of paint. The more basic colors can be purchased in large 8 ounce (236 ml) bottles for under two dollars American. There are many paints put out by miniature companies. I have only had experience with Games Workshop paint. As near as I can tell the difference between cheap craft paints and the so called professional miniature paints is only in the price. You pay much more for much less paint. Some of the Games Workshop paints are better but some are worse. I'm not going to get into technical terminology but I studied art when I was in school so I have a pretty good idea what paint is all about. Many great mini painters swear by "Pro" paints but it has been my experience that craft paints work just as well. Your mileage may vary but personally I'd rather have the extra money saved to spend on more miniatures. I always use spray paint to base coat or "prime" my miniature. I paint over black and use either a flat or satin paint. Krylon brand is pretty good but I have had reasonable results from cheaper brands.
Step 1: Preperation
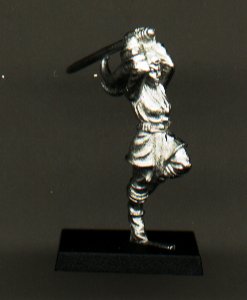
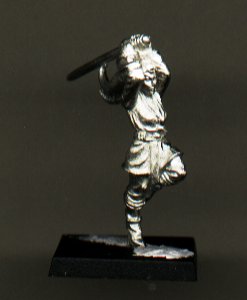
The first thing you want to do after you remove the miniature
from the package is inspect it for flashing and mold lines. Flashing
is any small pieces of metal that have formed during the casting process
where the mold didn't fully seal or where there were vents to let air escape.
Often flashing will be found in joints or tight corners. Mold lines
are formed along the line where the mold comes together. Mold lines
are essentially flashing but in a very low relief. You need to do
your best to try to remove these lines. I often use an X-acto knife
to cut flash out. I finish the area with a needle file or the blunt
back of the knife. Mold lines can usually be removed by dragging
the blunt back of an X-acto knife along the line. Sometimes needle
files work well for mold lines as well. Be careful when removing
flash and mold lines that you don't destroy any detail. After you
remove the flash and mold lines glue the miniature to the base. You
may also want to fill the gaps in the base with a little epoxy putty.
For filling bases I use off the shelf Duro epoxy putty because it is affordable
but you must be careful because it is toxic. Read the package instructions
before working with it. The Duro putty smooths easily with some water
but you need to work it quickly. Some miniature hobbyist use the
same expensive putties used to sculpt and convert miniatures to fill their
bases. To me however this is a needless waste when a much more affordable
alternative is available. Instead of putty you may try to cut down
masking tape to cover the gaps in the base. I have used it in the
past and it works quite well.
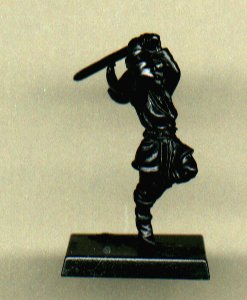
Step 2: Prime the Miniature
Now you need to prime you miniature with a base coat of spray
paint. You notice I am using black. Most miniature painters
use white. There is nothing wrong with using white but if you chose
to do that you will need to stop reading this tutorial and search out one
that gives techniques for painting over a white base coat. You will
also notice I have employed a satin paint for this particular miniature.
Sometimes I do that because it is slightly smoother than flat paint.
I do not recommend you try satin if you are a first time or novice painter.
Stick with the flat finish paint. It is much easier to control the
paint and will take the paint a bit better.
When spraying you miniatures be careful of the temperature.
You don't want to be painting them in a cold or humid area. This
can cause a number of complications with spray paint. I usually try
to prime my miniatures outside on a nice day.
The best way to spray the miniature is to stay within about six
inches from the miniature you are painting. And try to spray horizontally
to the miniature. Don't get too far away from the miniature because
that could cause the finish to become grainy because small droplets of
paint will start to dry before they adhere to the surface of the miniature.
That will ruin the finish and make it nearly impossible to paint the miniature.
Conversely if you get too close to the miniature the paint may get too
thick and ruin the detail. Either way you will have to remove the
miniature from the plastic base and strip the primer with finger nail polish
remover. If you have to do this never leave the plastic base on or
it will be melted into a nice gooey substance. Try and paint both
the front and the back on the miniature at the same time. When that
dries you can set the miniature on its back and spray at a 45 degree angle
to get the under side of the details. When that dries flip it over
and do the back.
Sometimes I get really lucky and can go right into painting from
there but more often than not I have to touch the base coat up by hand.
It is important that you don't just keep spraying the miniature to try
and get all the spots you miss on the first half. Too many coats
of spray paint can eliminate subtle surface detail.
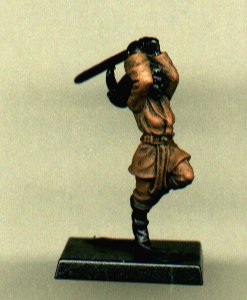
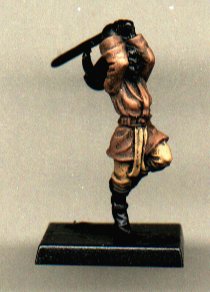
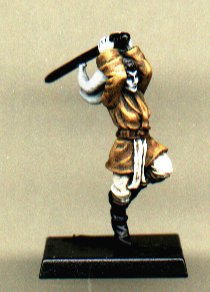
Step 3: Block in the Large Areas
Now you can go to painting the miniature. Every miniature
painter starts somewhere else. Some paint the skin tones first then
go on from there. What I do is paint large to small. I look
at what color is going to be dominate and cover the largest surface area.
In this case the Jedi is going to wear a brown tunic and white pants both
of which will have the same underlying color of a darker brown. For
simplicity sake I have also decided to use the brown for the belt but not
the boots because I want then to remain black.
Now that I know where I am going to start and what color I am
going to use I start to block that color in with a fairly large brush.
To do this I load up the brush with paint then wipe most of it from the
bush leaving the brush damp with paint but not dry. Then I drag the
brush over the areas I want this color to be leaving the black paint showing
in the darkest surfaces. After the first few passes I continue to
repeat the process using lighter and more careful strokes as I go to pick
out the largest highlights. Things don't have to be perfect at this
stage. If you get a bit of paint on a smaller detail you can paint
over it when you get to that spot. Sometimes a miniature has more
than one large areas that you may want to be completely different colors.
I usually try and block in all my large areas at the same stage.
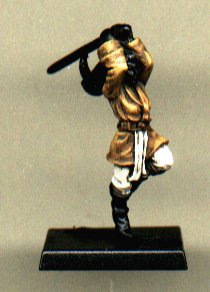
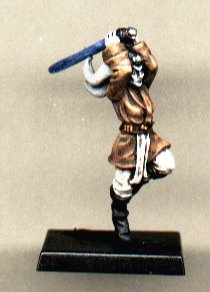
Step 4: First Highlight stage
The first highlight stage is a lot like the blocking in stage
but more controlled. Usually I have the paint a little wetter at
this stage but only slightly. Take the same color paint you used
to block the color in with and mix it with a lighter shade of that color.
You can also mix in a little white if you don't have a lighter shade of
your base color but it doesn't work well for every color. For; reds,
greens, and some browns it often works better to add some yellow.
On this miniature I have chosen a honey colored tan. Note that I
added more tan to the areas I want to be white and less to the areas I
want to be brown. What you want to do here is pick up only the large
highlight areas leaving a transition between the base color and the black
primer coat. This will leave you with a smooth gradation between
the shadows and highlights. If you cover the base color completely
the transition will be too abrupt. On this miniature I also avoided
the belt which I wanted to be the darkest brown. The belt is still
shaded and has definition. Doing this kind of thing when you can
will help you paint faster and have more painted miniatures to game with
so when you are working out the color design for a miniature consider when
you can employ this kind of shortcut. It if most effective when painting
in browns, blacks, greys, and whites but also when painting in reds, oranges,
and yellows.
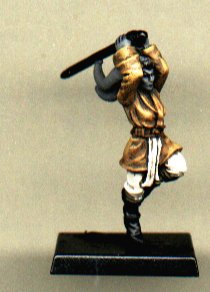
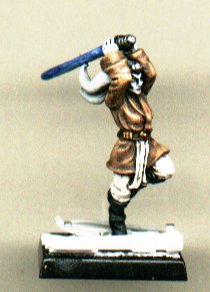
Step 5: Second Highlight Stage
Now you want to paint the brightest highlights. Only the
very highest areas of detail. Generally I get a fairly small detail
brush for this and apply the paint in thin coats one highlight at a time.
Depending on the level of gradation you want you may want to quickly blend
in a few stages of progressive lightless one on top of the other at this
stage getting lighter as you go until you have a subtle gradation between
the darkest dark and lightest light. Sometimes I simply add one shade
lighter color at this stage. It depends on how things are going.
On this miniature I added two more levels of highlight to the tunic and
three to the pants and sash. The lighter you go the more careful
and accurate you must be to preserve the subtle gradation.
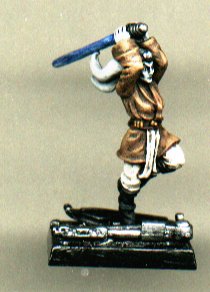
Step 6: Block in the Smaller Areas
Basically this is exactly like step 3 but you need to be more
careful and use a smaller brush. On this figure the I am blocking
in the skin tones at this stage but avoiding the detail parts like weapons
and jewelry.
Step 7 & 8: Highlighting the Smaller Areas
Again this is like steps 4 and 5. This Twi' Lek has white
skin but I only apply white to the highest relief. Skin is basically
transparent so I try and capture that when doing a skin tone. I tend
to wet down the paint quite a bit and paint in several transparent layers
blending and working my way up to the brightest tints. I usually
try and make the face the lightest area of the skin because it is the focus.
I also have done the boots with two layers of highlight on only the high
relief areas because I want them to appear well kept but not glossy.
If I wanted them to appear ruff I would paint a larger area of them grey
and have a more subtle variation between shadows and highlights.
If I wanted them glossy I would paint only a very light highlight on the
highest relief areas with no gradation at all. This is very tricky.
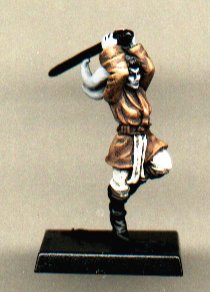
Step 9: The Details
Now I paint in the very small details like weapons and jewelry.
Some of these may take more than one layer of highlight but others will
only need one layer of paint. At this point I also carefully paint
the eyes. Eyes are hard and take practice. I paint the eye
white then paint the black dot in the center careful to make sure I make
it look as if both eyes are pointing the same way. It is best to
not have white showing around the black or the miniature will look surprised.
Step 10: Finishing the base
Now I paint the base and add finishing details. On this
miniature the base ended up being a bit of an after thought. I decided
to try and reproduce the look of the bases on the Wizards of the Coast
Star Wars miniature page. So I grabbed my Anakin's Pod Racer model
I use for kit bashing and went to work. This would have been easier
if I had done it before I primed the model and I had to prime it black
by hand. I wouldn't recommend doing this kind of fiddily modeling
on a fully painted miniature but I'm not really sane so it's ok for me.
It worked out pretty well though it is hard to see it in this picture.
I plan to do an article just on bases in the future where I will talk more
about this subject.
Step 11: Clear Coat
Because we are painting these miniatures to use in a game and
not just sit in a glass case and look pretty you need to protect the paint
job with a clear coat. I use a coat or two of clear matte varnish
to protect my miniatures but I have also heard of people using a gloss
varnish with a layer of matte over that because the gloss varnish is tougher
than the matte varnish but the matte gives a better looking finish that
looks more natural.
Well now we are done. Have fun!